

Using Scripting to Enhance the AVEVA Alarm Client Control
This Training Document is avaiable for public viewing. Access to our full library of training documents is included with any current Industrial Software Solutions Training Subscription.
To learn more about ISS Training Subscriptions and pricing, please contact us.
CONTACT US
OVERVIEW
The AVEVA Alarm Client Control is a .NET control available in all Standalone + Symbols and Managed InTouch applications in 2020 and newer. Since it is a .NET control, it has a number of built-in properties and functions that can be used to enhance the basic Alarm Client functionality. In this training document, we will utilizes these options and create several buttons to perform the following functionality:
- Alarm Acknowledgement
- Acknowledge all alarms
- Acknowledge selected alarms
- Alarm Filtering
- Call a pre-defined Query/Filter
This document assumes you have knowledge on alarms, alarm groups, creating button elements, and configuring animations in the Industrial Graphic editor. For information on configuring a basic AVEVA Alarm Client Control, please see ISS TN 95. A full list of the properties and scripts can be found in the Alarm Client Control Guide starting on Chapter 4.
For the purposes of this Training Document, you can download and use the AlarmClientTraining application which contains a basic Alarm Client which we will be building on and 5 tags in alarm state for testing purposes.
The application can be downloaded Here
NOTE: The training application can be used in InTouch version 2020 and newer. You can also use your own basic Alarm Client as a starting point.
APPLIES TO
- InTouch HMI (all versions)
EXPLANATION
Overview on .NET Control Properties and Methods
A Property is used to access or set a value of a particular component of the .NET control. A Method is used to perform some action for the control. Methods sometimes require Parameters which are values to provide to the Method so that it can do something with these values. You can pass Arguments to the Parameters by typing the values to pass within parentheses.
For example, let’s look at the Ack.All() method:
The Ack.All method acknowledges all alarms in the Alarm Control, including those not shown.
Syntax
AlarmClient.Ack.All(AckComment);
Parameters
AckComment
A string indicating the alarm acknowledgement comment.So if we wanted to utilize this method, we would need to provide a string value Argument that the Method would utilize for the AckComment Parameter.
Example
AlarmClient1.Ack.All("Alarm is acknowledged");This script acknowledges all alarms and provides each alarm the alarm comment: “Alarm is acknowledged”.
Scripting .NET Controls in QuickScript .NET
When scripting the .NET controls, you must make note of their Graphic Name in the Industrial Graphic Editor. In our example, our Alarm Client retains the default name AlarmClient1.
Any scripting of .NET controls follows this basic format:
AlarmClientGraphicName.Property
or
AlarmClientGraphicName.Method
or, when the method is built-in to another property
AlarmClientGraphicName.Property.Method
The QuickScript .NET editor provides a way to view the properties and methods once you’ve typed in the Graphic Name in the script editor. If you type AlarmClientGraphicName, the QuickScript .NET editor will provide a list of properties and/or methods.
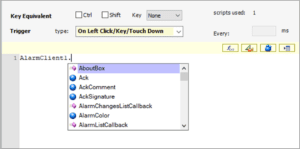
You can also use this auto-complete feature to view any Parameters required for a particular Method, by typing “MethodName(”

IMPLEMENTATION
Alarm Acknowledgement
Section 1 – Acknowledge All Alarms
There are several properties and methods you could use to acknowledge all alarms. In this document, we will be using the Ack.All() method, previously discussed in the Overview on .NET Control Properties and Methods section.
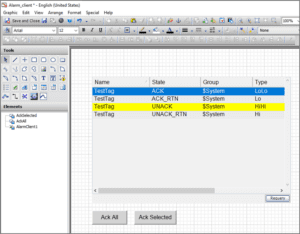
- Open AlarmClientTraining in WindowMaker. Open the Live_Alarms window and then right-click the Alarm Client symbol -> Industrial Graphic “Alarm_client” -> Edit Symbol… to open the Alarm Client symbol for editing.
2. Create a Button element named AckAll. In Properties -> Appearance -> Text, enter Ack All. Position it below the Alarm Client element.
3. Double-click AckAll to open the Edit Animations window. Click the + button to add a new Interaction -> Action Scripts animation.
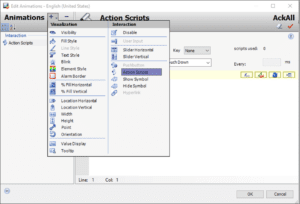
4. In the body of the script, type:
AlarmClient1.Ack.All(“Acknowledging all alarms.”);
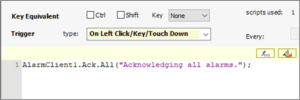
And then click OK to save/close the Edit Animations window. Save and close the graphic editor.
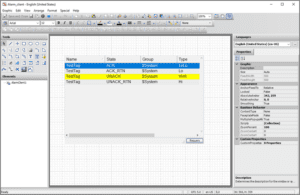
5. To test the button, open WindowViewer and open the Live_Alarms window. 5 alarms should appear. Click the Ack All button and observe the behavior.
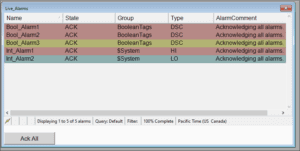
All alarms become acknowledged, and the AlarmComment field is set to our specified Argument, “Acknowledging all alarms.”. Close and reopen WindowViewer to regenerate the alarms for further testing if you choose.
Section 2 – Acknowledge Selected Alarms
You can acknowledge individual alarms in the Alarm Client by right-clicking an alarm record -> Ack Selected. However, this functionality can also be added to a button. We will use the Ack.Selected() function.
Syntax
AlarmClient.Ack.Selected(AckComment);
Parameters
AckComment
A string indicating the alarm acknowledgement comment.
Example
AlarmClient1.Ack.Selected("This selected alarm is acknowledged");
- Open AlarmClientTraining in WindowMaker. Open the Live_Alarms window and then right-click the Alarm Client symbol -> Industrial Graphic “Alarm_client” -> Edit Symbol… to open the Alarm Client symbol for editing.
2. Add a new button named AckSelected to the right of Ack All, or a place of your choosing below the Alarm Client if you did not make the Ack All button. In Properties -> Appearance -> Text, enter Ack Selected.
3. Double-click AckSelected to open the Edit Animations window. Click the + button to add a new Interaction -> Action Scripts animation.
In the body of the script, type:
AlarmClient1.Ack.Selected(“Alarm acknowledged”);
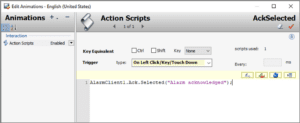
And then click OK to save/close the Edit Animations window. Save and close the graphic editor.
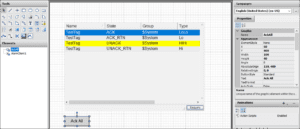
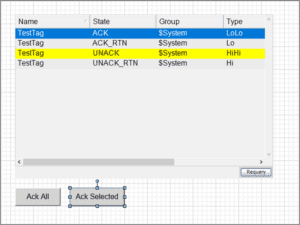
4. To test the button, open WindowViewer and open the Live_Alarms window. 5 alarms should appear. Select one or more (ctrl + click) alarms and then click the Ack Selected button and observe the behavior.

In this example, I used ctrl + click to select “Bool_Alarm3” and “Int_Alarm2”. Then I clicked the Ack Selected button, and they became acknowledged. In addition, the AlarmComment field is set to our specified Argument, “Alarm acknowledged”. Close and reopen WindowViewer to regenerate the alarms for further testing if you choose.
Alarm Filtering
Section 3 – Call a Pre-Defined Query/Filter
One way that we can set our Alarm Client to show a specific Alarm Group is to use a pre-defined Query/Filter. For Live Alarms, Queries are used to filter alarms. For Historical Alarms, Filters are used.
We can then call that Query/Filter by using the Favorite Property.
The Favorite property is a read-write string property that gets or sets the name of the current query filter favorite.

Syntax
QueryFilterName = AlarmClient.Favorite;
AlarmClient.Favorite = QueryFilterName;

Parameters
QueryFilterName
The name of a query filter favorite.

Example
The following example sets the current Alarm Control grid to the Query Filter Favorite with the name "All Hi Priority Alarms".
AlarmClient1.Favorite = "All Hi Priority Alarms";
- Open AlarmClientTraining in WindowMaker. Open the Live_Alarms window and then right-click the Alarm Client symbol -> Industrial Graphic “Alarm_client” -> Edit Symbol… to open the Alarm Client symbol for editing.
2. Double-click AlarmClient1 and choose Queries and Filters from the Configuration options.
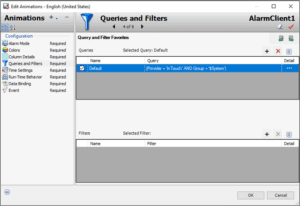
3. Since this is a Live Alarms client, click the + button above Queries to add a new one. The Add Query or Filter window opens.

4. Name the Query “Discretes”. Select Group from the list and click the green right arrow. Then select Group from the middle pane, type “BooleanTags” in the value field, and click Set.
In the AlarmClientTraining application, BooleanTags is a defined Alarm Group. The three Discrete tags have BooleanTags configured for their alarm group, whereas the two Integer tags have $System set for their alarm group.

5. For Live Alarms, a provider must also be specified. Select Provider from the and click the green right arrow. Then select Provider from the middle pane, type “InTouch” in the value field, and click Set.

Click OK to close the Add Query or Filter popup. Then click OK again to close the Edit Animations window.
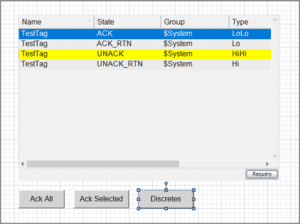
6. Add a new button named Discretes to the right of Ack Selected, or a place of your choosing below the Alarm Client if you did not make the Ack Selected button. In Properties -> Appearance -> Text, enter Discretes.
7. For the purposes of this document, we will create a Discretes button that utilizes a pushbutton “Toggle” animation. Clicking the button will set the Query to “Discretes”. Clicking the button again will set our filter to back to “Default”. Double-click Discretes to open the Edit Animations window. Then click the + button to add a new Interaction -> Action Scripts animation.
In the body of the script, type:
AlarmClient1.Favorite = “Discretes”;
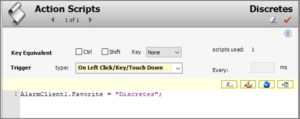
And then click OK to save/close the Edit Animations window. Save and close the graphic editor.
8. To test the button, open WindowViewer and open the Live_Alarms window. 5 alarms should appear. Then click the Discretes button. The Alarm Client should now show 3 alarms from the discrete tags only, and the Query is set to “Discretes”.

All Industrial Software Solutions Training Documents are provided "as is" without warranty of any kind.