

How to use the ArchestrA Bulk Import utility to import Wonderware InTouch Tags
SUMMARY
With the release of the ArchestrA Bulk Import Utility, it is possible to directly convert AVEVA InTouch tagnames into the ArchestrA IDE (Integrated Development Environment) as application objects. This tech note details the basic procedure required to perform this task with a select set of AVEVA InTouch tags under a single alarm group. Specifically, this example involves importing discrete and analog tags used to represent pumps and PID (Proportional Integral Derivative) control loops.

Please note that the procedure for larger applications or 3rd party HMIs may be more involved. For further details on using the ArchestrA Bulk Import utility please consult the product documentation or contact Industrial Software Solutons Technical Support.
APPLIES TO
- AVEVA InTouch – all versions
- AVEVA Industrial Application Server 2.1 with Patch 1 and greater
Part 1 – Preparation of AVEVA InTouch Application
1. It is vitally important that time is taken to review the existing tagname dictionary and rename any tags that do not follow a consistent naming convention. The ArchestrA Bulk Import utility relies on a consistent naming convention for tags and may not work properly if a naming convention is not followed.
Consistent tag naming will incorporate “delimiters” into the tag name structure to separate process sub-components (e.g. TIC101_PV, TIC101_SP, etc.). It is important that the same delimiter and structure is utilized throughout the all Wonderware InTouch tags, otherwise the ArchestrA Bulk Import utility will not be able to consistently recognize and create automation templates and instances.
Tags can be renamed with one of two methods:
- Open the tagname dictionary in AVEVA InTouch Windowmaker and select the appropriate tag. Change the name of the tag and click on the “Save” button. This method has the added bonus of automatically changing all animation references to reflect this naming change.
- Use the Wonderware InTouch application manager to dump the tags to a .csv file. Tagnames can now be modified directly in the .csv file using tools such as Microsoft Excel. Be careful when editing the file so no errors are made. Otherwise, you may not be able to use the .csv file with the Archestra Bulk Import Utility. Please note that this procedure will not affect the existing Wonderware InTouch application.
2. If option “a” was chosen in the previous step, when complete make sure to open the AVEVA InTouch Application Manager and perform a DBDump on the application to create a .csv file. A .csv file export is necessary for the Archestra Bulk Import Utility to perform the conversion.
Part 2 – Download and install the ArchestrA Bulk Import Utility
3. Download the ArchestrA Bulk Import Utility from this location: Bulk Import Utility
Note: Wonderware Application Server 3.1. installation CD includes the ArchestrA Bulk Import utility (but requires separate installation).
4. Extract the .zip file and run setup.exe. Install using default options.
Part 3 – Import the .csv file into the Bulk Import Utility
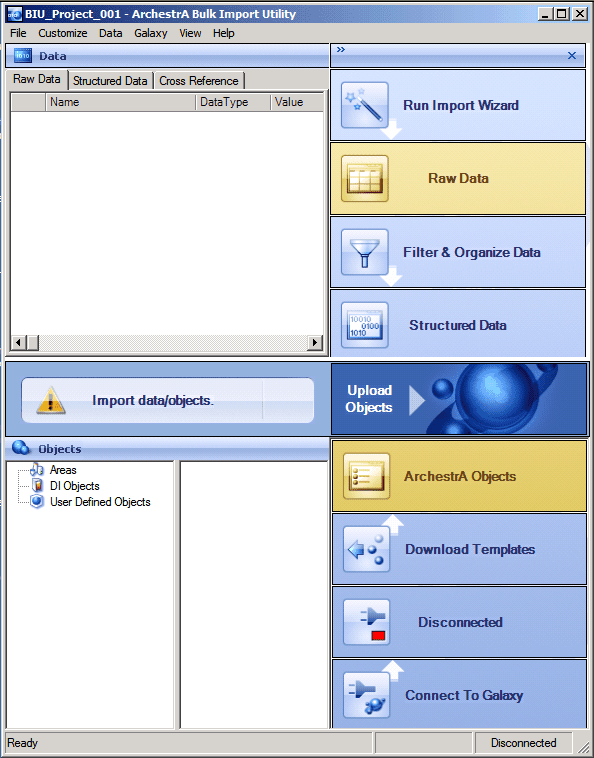
5. Start the ArchestrA Bulk Import utility by clicking on Start → Programs → Wonderware → ArchestrA Bulk Import Utility → ArchestrA Bulk Import Utility
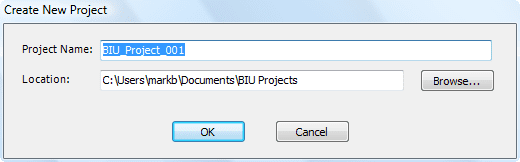
6. Click on File → New, and enter a project name and location. Next, click on OK.
7. Now, click on the “Run Import Wizard” button located on the top right of the ArchestrA Bulk Import utility.
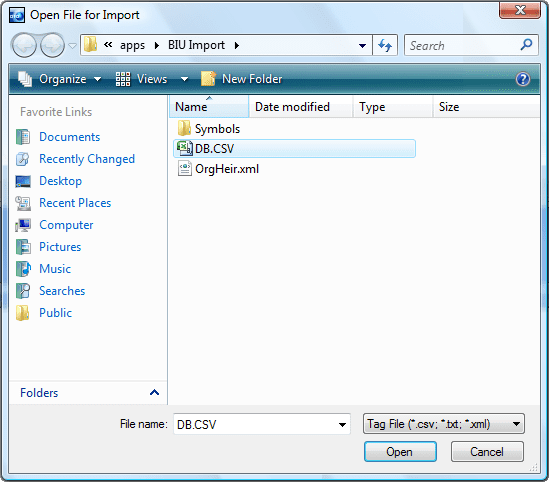
You will now be prompted to locate a .csv file for import. This .csv file contains the exported tagname definitions from a sample AVEVA InTouch application. Locate the .csv file that is included with this tech note. Click on the “Open” button when completed.
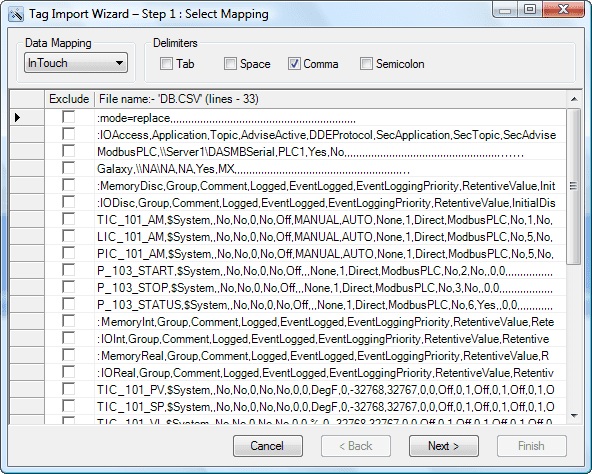
8. Next, in the “Tag Import Wizard – Step 1” window, change the “Data Mapping” listbox so “InTouch” is selected. Although the ArchestrA Bulk Import Utility includes the ability to import generic .csv files from almost any source, the sample .csv file was derived from an AVEVA InTouch application. Thus, it is appropriate to use “InTouch” data mapping for the .csv import. Click on the “Next” button when complete.
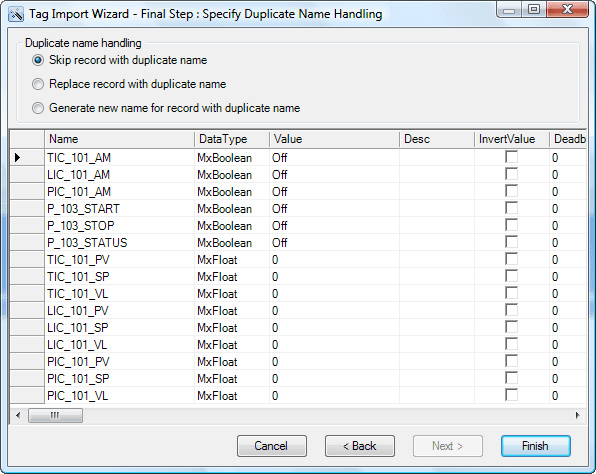
9. Next, in the “Tag Import Wizard – Final Step” window, select the appropriate option for “Duplicate name handling” (generally left default). This particular selection controls the behavior of the ArchestrA Bulk Import Utility when encountering duplicate tagnames. For this example, there will be no duplicates but it may be necessary to generate new names for tags if the .csv file were to include duplicates. Click on the “Finish” button when complete.
Part 4 – Filter and organize tag data
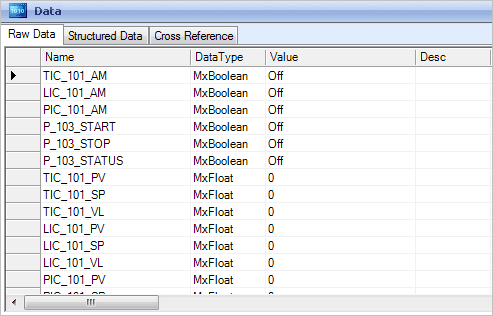
10. The “Raw Data” section of the Bulk Import utility should now be populated with tagname data which was imported from the AVEVA InTouch application.
11. Click on the “Filter and Organize” button on the right side of the ArchestrA Bulk Import utility. This will expose filtering options on the bottom of the application. Depending on the tag naming convention used in the AVEVA InTouch tags, the process here will vary. Some experimentation may be necessary to arrive at the desired results. Here are the basic steps:
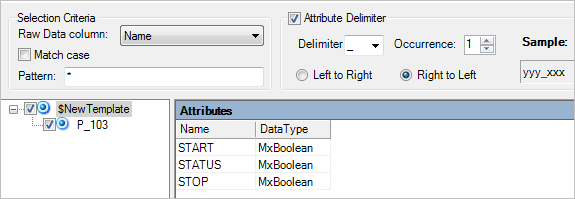
- In the “Attribute Delimiter” section, select the tag delimiter type and number of delimiters used in the naming structure. For example, if a sample tag looked like “TIC_101_PV” we would select “_” as delimiter type and 1 for the occurrence (TIC_101 is considered a unique entity, therefore its delimiter does not count).
- In the “Attribute Delimiter” section, select “Right to Left“
- In the selection criteria area, information can be entered to filter specific results. For example, if only tags starting with “TIC” are desired one could enter “TIC*” into the Pattern field. Other valid wildcards that can be user here are: * (one or more characters), ? (single character), < (search text must occur at beginning – e.g. <TIC),>TIC), < (search test must occur at end)
12. Next, click on the “Apply” button to apply the tag filter.
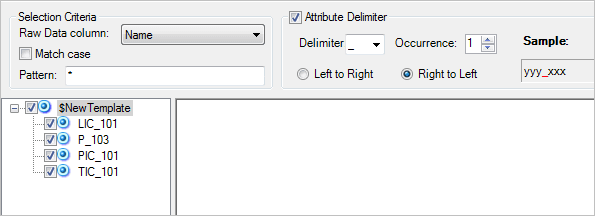
13. As we can see in the results of this filter, some dissimilar objects have been found (pump mixed in with PID loops). Since we want to create a template and objects that specifically represent PID loops, we need to either refine the search or simply unselect the pump (P_103) from this template. This will ensure that only similar objects are included in the “object definition”.
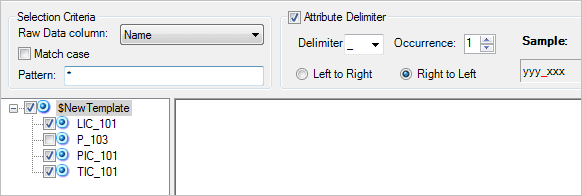
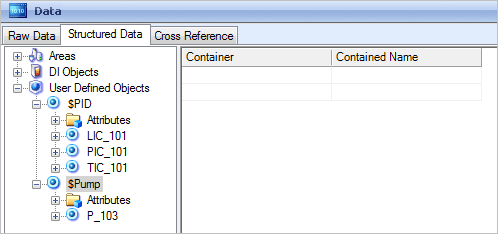
14. Now, click on the “Define Object” button on the bottom right corner of the ArchestrA Bulk Import utility. These selected objects will now appear under the “Structured Data” tab. Right-click on the $NewTemplate object to rename it to represent the appropriate template name (in this example, we will call it $PID). The template name must be proceeded by a “$” character. Effectively, these tags have now been converted to objects based upon a template.

15. To complete the raw data import, a $Pump template will be created for the P_103 pump that was excluded in previous steps.
Begin by clicking on the “Close” button on the bottom filter window, and then click on the “Filter and Organize” button to start another filter. Configure the filter and apply as in previous steps. The pump (P_103) should now be located under a unique template. This is important because we want this pump to be derived from its own template.
16. Click on the “Define Object” button, and rename the $NewTemplate object under the “Structured Data” tab as appropriate (in this case, we will name it $Pump). This will allow us to correctly identify the template once the bulk import is completed.
Part 5 – Import new templates and instances into the Galaxy
17. Before continuing, close the Filter dialog by clicking on the “Close” button. To import your newly defined templates into the galaxy, click on the “Download Templates” button on the right side of the ArchestrA Bulk Import utility. You will now be prompted to connect to the appropriate galaxy. Select the galaxy name and enter the required user name and password. Click on the “Connect” button.

Note: You will only be prompted to enter user login credentials if security has been enabled within the galaxy.
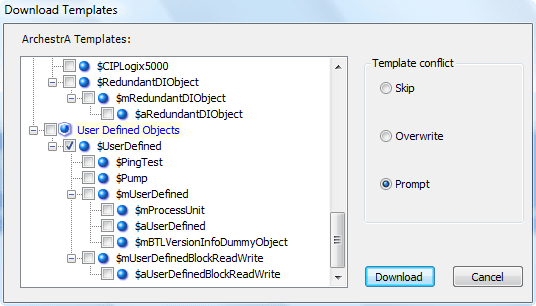
18. After the templates have been downloaded from the galaxy, you will be prompted to select templates that are to be imported into the ArchestrA Bulk Import utility. This step is necessary so that base templates will be available for further derivation. Also, if there are pre-built templates that are to be used they can be imported here.
In this example, we will only be deriving templates using the base $UserDefined object template. This is typical for most bulk imports, as the $UserDefined object is designed to handle most import scenarios. Also, the $DDESuitelinkClient object and $Area object will be used to derive IO data sources and alarm groups from the Wonderware InTouch application.
Check only the $UserDefined, $DDESuitelinkClient and $Area object in the list and click on the “Download” button.
Note: Template downloads can be re-initiated in case a mistake was made in this step
19. Once the template download has completed successfully, click on the “Close” button.

20. The $UserDefined and $DDESuitelinkClient object templates should now be located under the “Objects” section of the ArchestrA Bulk Import utility.
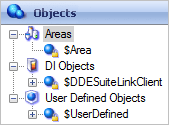
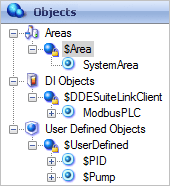
21. Drag and drop to assign:
- the $PID and $Pump templates from the “Structured Data” section to the $UserDefined object template in the “Objects” section,
- the ModBusPLC object from the DI Objects section of “Structured Data” to the “DI Objects” section of the “Objects“,
- the “System Area” object from “Structured Data” to the “Areas” section of “Objects“
This procedure assigns the templates created by the ArchestrA Bulk Import Utility to base templates that exist in the galaxy. This is necessary as all derived templates need to be related to the base templates.
22. Now, click on the “Upload Objects” button on the right side of the ArchestrA Bulk Import utility. You will now be prompted to select which objects are to be uploaded to the galaxy. Place a check beside the “DI Objects“, “User Defined Objects” and “Areas” then click on the “Validate” button. Effectively, all new objects are going to be uploaded to the galaxy.

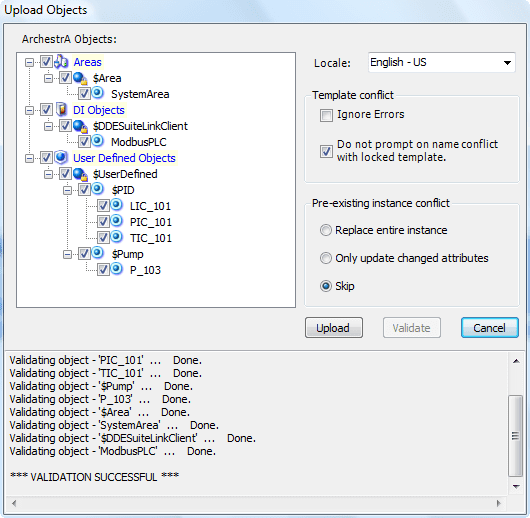
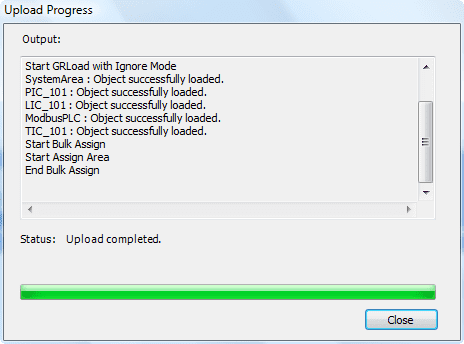
23. Upon successful validation, click on the “Upload” button and the ArchestrA Bulk Import utility will upload these objects to the connected galaxy.
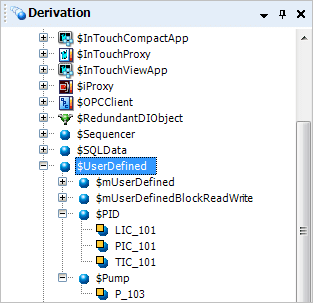
24. Open the galaxy with the ArchestrA IDE to ensure all objects are uploaded and ready for use. Please note that further configuration of the imported DDESuitelinkClient object may be required. Also, uploaded objects may need to be assigned to appropriate area objects and then deployed.
All Industrial Software Solutions Tech Notes are provided "as is" without warranty of any kind.