

Configuring the DDESuitelink Client Object in the ArchestrA IDE
SUMMARY
This tech note details the procedure used to configure DDE (Data Dynamic Exchange) and AVEVA SuiteLink client connections using AVEVA Application Server and the System Platform IDE (Integrated Development Environment). The DDESuiteLinkClient object available in System Platform IDE provides a client connection to DDE or SuiteLink servers so that data can be read and written to external data sources such as a PLC (Programmable Logic Controller).
This tech note consists of three parts:
1. Details the process of configuring and deploying a new instance of the $DDESuiteLinkClient template for communication with a data source,
2. Details testing of the deployed DDESuiteLinkClient object
3. Builds on the previous steps and configures an automation object which will reference data from the DDESuiteLinkClient object.
Specifically, this example will detail the procedure for connecting AVEVA Application Server to an OI-Server (Operations Integration Server) using the DDESuiteLinkClient object.
Applies to
- AVEVA Application Server 2.x and later
- AVEVA DA Server/OI Server
PROCEDURE
Part 1 – Creating, configuring and deploying a new instance of the DDESuiteLinkClient Object
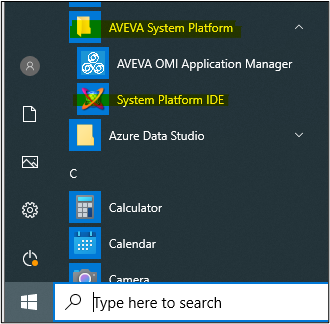
- Open the System Platform IDE application (Start -> AVEVA System Platform -> System Platform IDE
Then, connect to the appropriate Galaxy (in this tech note the galaxy’s name is “Test”).
Note: A deployed Platform, Engine and Area will be necessary for this example.

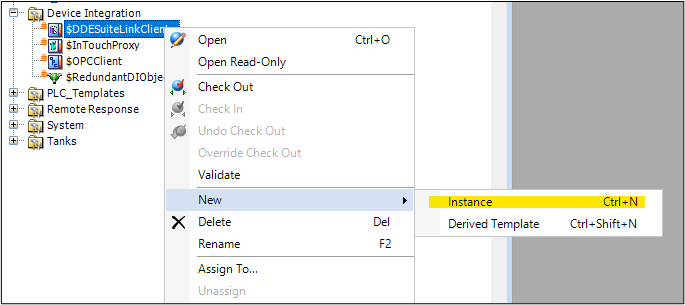
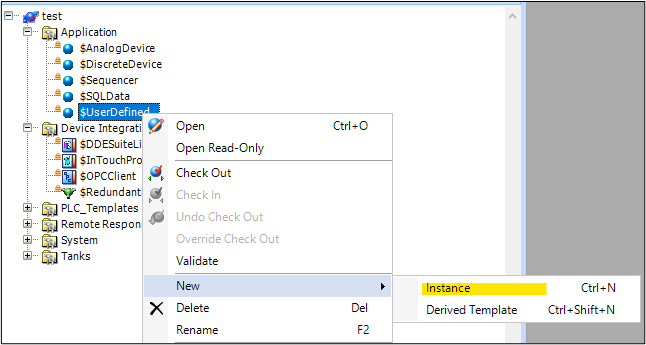
- Select the Template Toolboxtab and locate the $DDESuiteLinkClient object template under the Device Integration folder by default. Right-click on the object template and select “New -> Instance” to create a new instance of the DDESuiteLinkClient object.
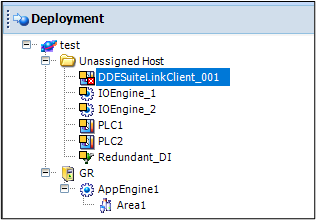
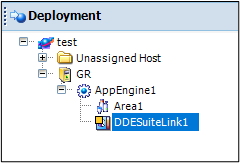
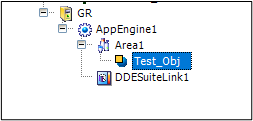
You should now see a new instance of this object in the Unassigned Host area of the Deployment View. Rename as desired. In this example, the object will be named “DDESuiteLink1”.
-
- Double-click on the newly created instance to open its configuration in the right pane.
On the General tab enter “Server node” and “Server name”.
-
- “Server node” field – configure with the node name or IP address where the OI or DAServer is located (in this example the OI Server is located on a host called WINDOWS10VM);
- “Server name” field – configure with the application name of the DDE or Suitelink server (in this example the application name used is MBTCP; if the required application name for the data source is not known, please refer to the product documentation);
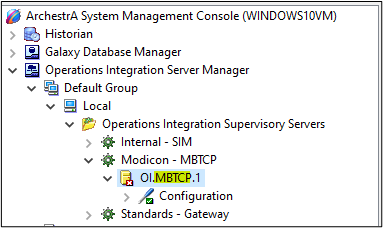
NOTE: The “Server name” naming convention for OI-Servers can be verified in the SMC -> Operations Integration Server Manager -> Default Group…Operations Integration Supervisory Servers. Then locate your desired OI-Server. The name used in DDESuiteLinkClient configuration will be the middle part of the server name here (example, “MBTCP”).
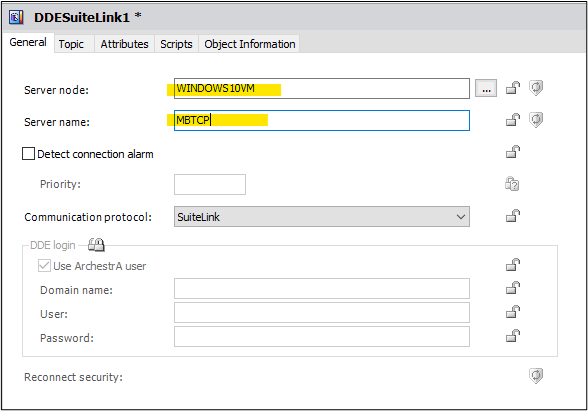
Next configure the rest of the fields for this object:
- Detect connection alarm generates an alarm upon connection loss
- Communication protocol determines whether DDE or AVEVA SuiteLink protocol is being used (NOTE – DDE is a legacy protocol. SuiteLink is the option you will want for OI and DA Servers.)
- DDE login allows a specific Windows user account to be used for DDE/NetDDE communication (NetDDE – Network Dynamic data Exchange). Legacy option for DDE protocol.
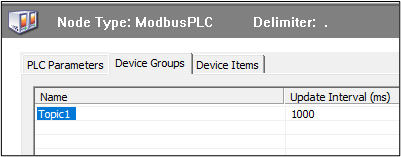
- Switch the Topictab on the configuration window and click on the blue plus (+) sign above the topic list to add a new topic. In this example, our topic name will be “Topic1”.

Note: This topic name needs to exactly match the topic or device group that has been configured in the OI or DAServer. If the required topic name is unknown, please review the configuration of the associated OI or DAServer (below is an example of the MBTCP Device Group configuration)
- Now, save and check-in the configured DDESuiteLinkClientobject. Assign this object to an engine in Deployment View.
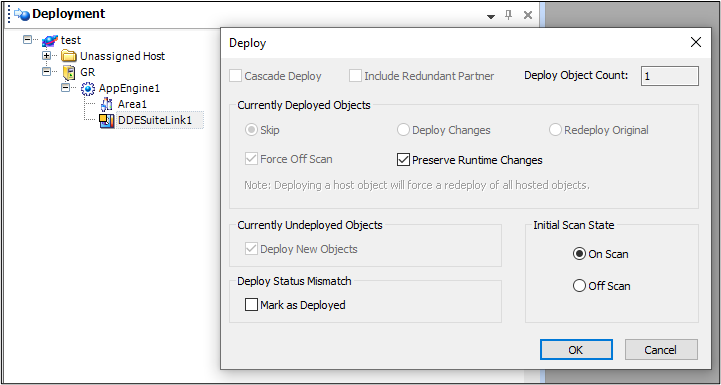
- Make sure the OI or DAServer being used is started before deployment. Then right-click on this object and select Deploy. Click on the OKbutton to confirm deployment.
Part 2 – Testing the deployed DDESuiteLinkClient object
- Right-click on the deployed DDESuiteLinkClientobject and select View in Object Viewer from the menu. This will open the Object Viewer window.
In that window you will see a list of the attributes of DDESuiteLinkClient object. Locate ConnectionStatus and confirm its value is Connected.

If the ConnectionStatus value is not Connected, review the configuration of the DDESuiteLinkClient object for errors and make sure that the associated OI or DAServer is running and connected to the network.
Note: The values listed in the Object Viewer are not automatically updated. To update the current value of an attribute, either click and highlight the attribute in the list, or right click on the appropriate attribute and add it to the watch window.
Part 3 – Configuring an application object to reference data from the DDESuiteLinkClient object
- Select an appropriate Application Object from the Template Toolbox. Right-click on this object and select “New -> Instance“. In this example, the $UserDefined template will be used.
Move this new instance from the ‘Unassigned Host‘ area to an ‘Area‘ instance in Deployment View.
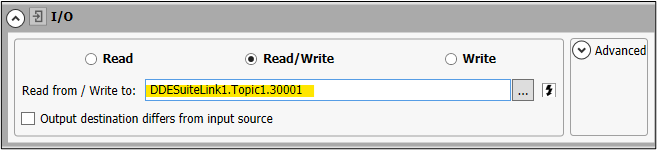
- Double-click on this new object instance to open its configuration. Create a new Attribute (“IO_Test” in this example) and enable the “I/O” feature.
The OI reference should have the following format:
<DIObjectName>.<TopicName>.<Item/Register> where:
- <DIObjectName> – the instance name of the DDESuiteLinkClient object
- <TopicName> – the exact topic name configured in the DDESuiteLinkClient object
- <Item/Register> – the data item from the data source, typically a PLC register or tagname
For example: DDESuiteLink1.Topic1.30001
NOTE: While not covered in this Tech Note, it is also possible to use “I/O Auto-Assignment” instead of manually entering the reference here.
- Save and check-in this object. Next, right-click on this object, select Deploy, and click OK.
- Once the object has deployed, right-click on it and select View in Object Viewerfrom the menu. Next, locate the attribute (“IO_Test”)in the list and confirm that both its value is correct, and the quality is C0:Good.
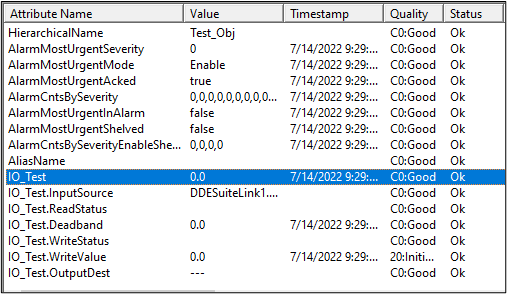
If the value is not correct and/or the quality is not good, confirm that the configuration for this item is correct and it is a valid data point in the PLC.
All Industrial Software Solutions Tech Notes are provided "as is" without warranty of any kind.